Monday, April 1, 2013

A Very Victorian Parlor and Dining Room


Here is an outside view, of the house's first two levels so far:


In particular, the recently completed first floor.

The Victorian parlor/living room and dining room, as well as the upstairs hallways, feature wallpaper with a red and coral geometric pattern against an ivory background; the parlor and dining room are made more formal with a subtly textured, soft gold paper below the chair-rail as well as gold foiled crown molding.


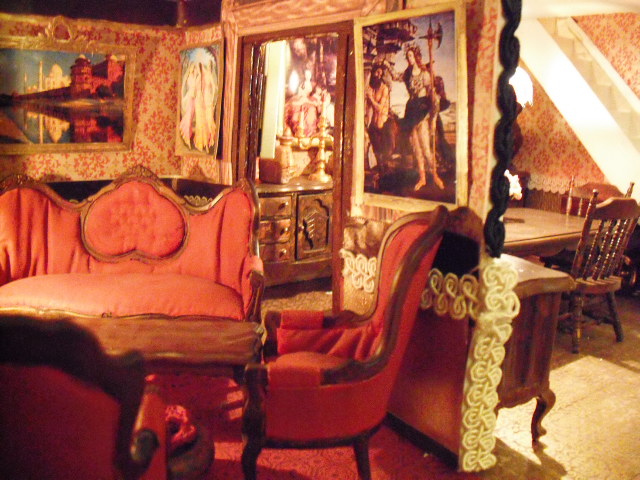
Re-arranged some furniture - the parlor now has a curio cabinet, gilded fireplace, several paintings, a grandfather clock, coffee table, Tiffany-style chandelier, and two arm chairs and a serpentine sofa upholstered in red:


Early stages of the dining room:

Adding some details like paintings on the walls, candelabra and fully stocked bar on the buffet, and a delicate flower arrangement:


Sunday, March 31, 2013

A Victorian Library and Another Bedroom

Working on the second floor of the house, involving a library full of hand made miniature books, a detailed hallway, and another bedroom in green and white with some special touches.


The second floor with the library, hall:


Yes, that is a lion. Because every family needs a pet, right?


Hallway with flowers and paintings:


The green guest room:


Happiness Is A Warm Tub


"If you don't let me gut out this house and make it my own, I will go INSANE, and I will take you WITH ME!" - a quote from Beetlejuice, one of my very favorite movies.

Funny because it is true.

Another quote from the same film: "Oh, look. An indoor outhouse." Decidedly NOT the case with the miniature bathroom in this house.


Here, I've put together a sheet of mother of pearl tiles for the floor (so shiny!!)


The essential wall tiles, wallpaper, tub, toilet, and sink are in, as well as the hamper


Add a mirror and a view from the outside


Turn on the light....


Change the lighting, add a plant...


Voila!


Sunday, February 10, 2013

Variations on a Japanese Theme (Finishing the Master Bedroom)

Final details on the Master Bedroom: A full length vintage dressing mirror, a red velvet rocking chair, and my hand embroidered runner carpet.


Saturday, February 2, 2013

Mirror, Mirror, On the Wall...


Close to finishing the Master Bedroom!

Here is a four-post canopy bed of my own design.  The fabric is actually taken from an antique black and red Japanese kimono, with little pillows and lace canopy curtains.


Don't you want to jump right in?

You can see the dark wood and red enamel wardrobe, the hardwood floors, and the origami papered walls.


A bedside table with a vase of roses, a red enameled vanity, some dressing accessories and a hand carved mirror on the wall. 


Friday, February 1, 2013

Miss Dystopia, Architect


This room has been the most complicated by far. First off, it's on the third floor of the main house, and so it has one side that slopes in a peculiar way. 

I'm not unfamiliar with this type of situation in a real house; my house (the white, wall paper free one) is of the Cape Cod style, with weird nooks and asymmetrical, slopes that make the upstairs ceilings 8' in the middle of the room, 7' at front of the closets, 4' at the back of the closets, and 6' at the exterior walls. In other words, all of the walls are perfectly vertical; it's just that the ceiling starts lower than others. 

Just like this:
(pardon my really bad Paint skills)


It gives one significantly less control over furniture placement, but I deal with it. What makes it manageable is the fact that the slopes are actually sloped ceilings, not sloped walls.  

The third floor of the dollhouse is shaped like a trapezoid; the exterior walls on both sides slope from floor to ceiling, and at a pretty sharp angle, making the master bedroom more like this:


So furniture placement is even more complicated. Any flat-backed piece you put against this wall looks kind of stupid. So, this one might take a while longer to complete.

Starting out, origami paper on the walls with silk and  lace borders


More to come, as soon as I decide how to put furniture in this room.


Thursday, January 31, 2013

And the Girl Said, "Let There Be A Kitchen"


And slowly a kitchen was created.

This is how the empty little room started:


Rather dreary, indeed.
And so the girl said, "Let there be light."


That's better. Now we can see what we're doing.

This is the lower level of the annex, and it is going to be my kitchen.
Have you ever had the loathsome chore of picking out wallpaper for a real house? I have. I hate it. The whole interior of my real house is white. Painted white. I have broken all of my fingernails down to the bed, scraped every knuckle, and fallen off of ladders to rid my real house of the stuff. Wallpaper? In my opinion? KILL IT!
But the Victorians loved it.
And as it turns out, there's a hell of a lot more variety to be easily obtained on a miniature scale. And you don't need gallons of toxic industrial adhesive to put it up, and you don't need vats of fabric softener and a titanium scraper to take it down. All you need is a clever eye and a stationary or craft store with a scrapbooking aisle to choose a small print, and a few dollops of Elmer's to put it up.

So, after adding in the appliances, a table and chairs, some shelving, a mother of pearl tile backsplash, and some kitchen accessories (including a silk flower arrangement), the kitchen is done!